마지막으로 stencil shader를 추가해서 정말 시야 범위처럼 보이도록 하자
쉐이더를 다루는 부분은 처음 해보는 부분이라 그냥 그대로 따라서 썼다
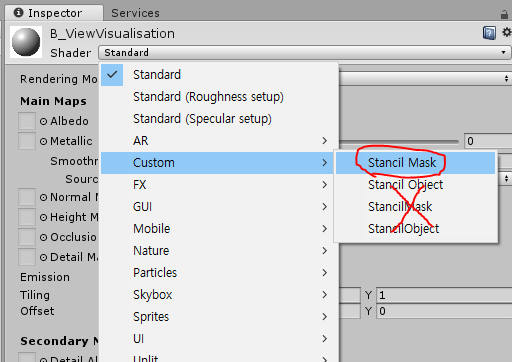
먼저 기본 쉐이더를 모아둘 폴더와, 기본쉐이더를 두개 생성한다
이름은 'StencilMask', 'StencilObject'
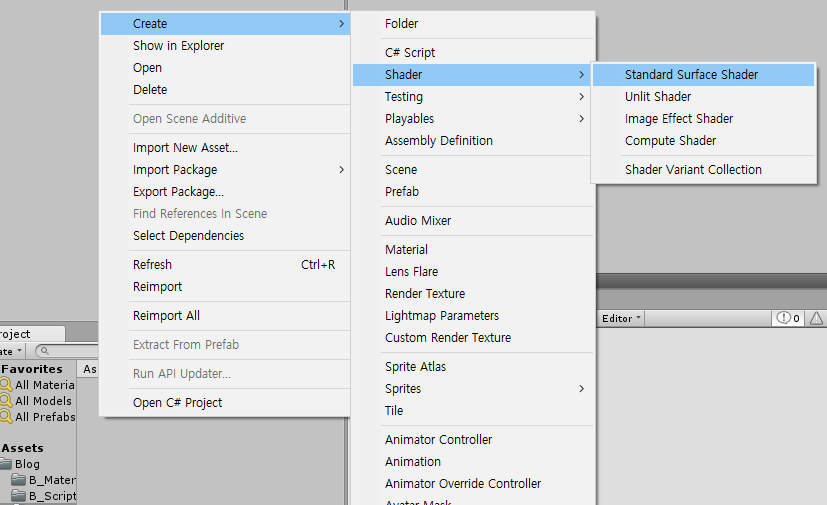
사진 설명을 입력하세요.
위 방법으로 셰이더 두개를 만든다
Shader "Custom/StancilMask" {
	Properties {
		_Color ("Color", Color) = (1,1,1,1)
		_MainTex ("Albedo (RGB)", 2D) = "white" {}
		_Glossiness ("Smoothness", Range(0,1)) = 0.5
		_Metallic ("Metallic", Range(0,1)) = 0.0
	}
	SubShader {
		Tags { "RenderType"="Opaque" }
		LOD 200

		CGPROGRAM
		// Physically based Standard lighting model, and enable shadows on all light types
		#pragma surface surf Standard fullforwardshadows

		// Use shader model 3.0 target, to get nicer looking lighting
		#pragma target 3.0

		sampler2D _MainTex;

		struct Input {
			float2 uv_MainTex;
		};

		half _Glossiness;
		half _Metallic;
		fixed4 _Color;

		// Add instancing support for this shader. You need to check 'Enable Instancing' on materials that use the shader.
		// See https://docs.unity3d.com/Manual/GPUInstancing.html for more information about instancing.
		// #pragma instancing_options assumeuniformscaling
		UNITY_INSTANCING_BUFFER_START(Props)
			// put more per-instance properties here
		UNITY_INSTANCING_BUFFER_END(Props)

		void surf (Input IN, inout SurfaceOutputStandard o) {
			// Albedo comes from a texture tinted by color
			fixed4 c = tex2D (_MainTex, IN.uv_MainTex) * _Color;
			o.Albedo = c.rgb;
			// Metallic and smoothness come from slider variables
			o.Metallic = _Metallic;
			o.Smoothness = _Glossiness;
			o.Alpha = c.a;
		}
		ENDCG
	}
	FallBack "Diffuse"
}
기본 셰이더다
뭔가 많이 있지만, 수정할곳은 많지 않다
먼저 StancilMask부터 수정하자
	SubShader {
		Tags { "RenderType"="Opaque" "Queque"="Geometry-100" }
	    ColorMask 0
		ZWrite off
		LOD 200

		Stencil {
					Ref 1
					Pass replace
				}
태그에 "Queque"="Geometry-100"를 추가하고
colormask는 0, zwrite는 off로 둔다
tag "Geometry " : 불투명 오브젝트 설정
https://docs.unity3d.com/kr/530/Manual/SL-SubShaderTags.html
ColorMask :
ColorMask 0 이라고 기재함으로써 모든 색상 채널의 렌더링을 무효화
https://docs.unity3d.com/kr/530/Manual/SL-Pass.html
zwrite :
픽셀을 깊이 버퍼에 기록하거나 제어(기본값은 On). 만약 불투명한 오브젝트를 그리는 경우, on으로 합니다
만약 부분적으로 투명 효과를 그리는 경우, ZWrite Off 로 전환합니다.
https://docs.unity3d.com/kr/530/Manual/SL-CullAndDepth.html
stencil:
이건 몰라서 패스..
https://docs.unity3d.com/kr/2018.4/Manual/SL-Stencil.html
다음으로 stancil object를 수정한다
	SubShader {
		Tags { "RenderType"="Opaque" }
		LOD 200

		Stencil {
			Ref 1
			Comp equal
		}
Stencil 부분만 추가한다
이제 마테리얼에 쉐이더 설정을 추가해준다

대상은 땅, 방해물, 타겟 3가지
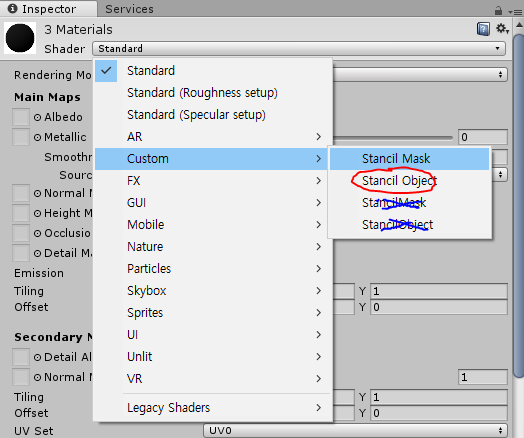
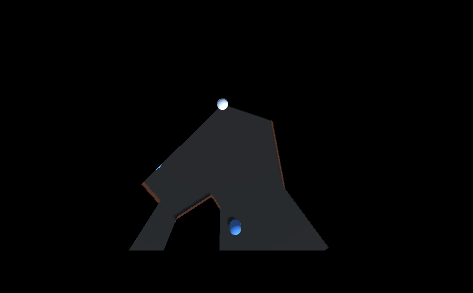
쉐이서를 custom -> stancil object로 변경
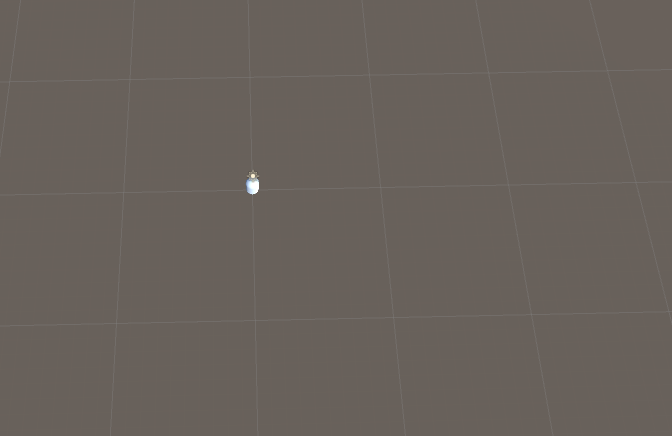
이렇게 오브젝트가 사라지게된다
스텐실이 적용된 오브젝트는, 스텐실 마스크를 통해서만 볼수있기때문이다
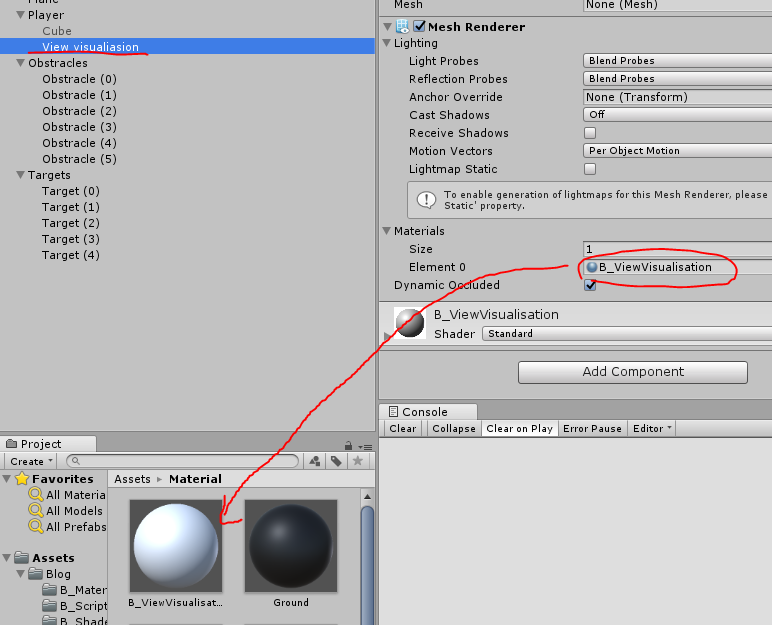
그다음 시야 범위 메쉬를 그려주던 마테리얼에 쉐이더를 입혀준다
쉐이더는 아까 만들었던 stancil mask
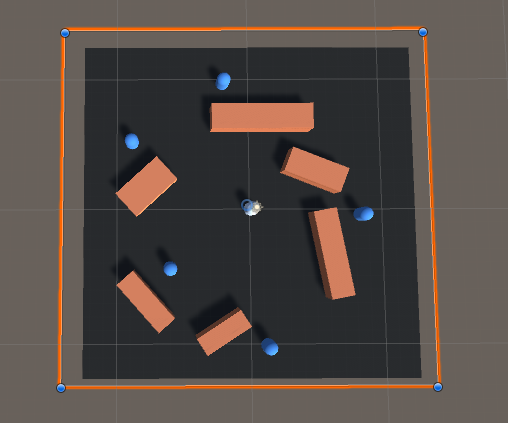
그다음은 씬 뷰 마스크를 추가한다
빈 오브젝트로 Plane을 만든다음 해당 마테리얼에 아까 ViewVisualisation쉐이더를 넣어주면 아래처럼 나온다
그다음 적당히 범위를 넓혀주고 수직방향(y)으로, 카메라보다 높은 위치에 올려둔다
타 오브젝트에 관여하지 않도록 하기 위함이다
(가이드영상에서는, Play이후 바로 비활성화 되도 상관없다고 한다)

해당 마스크는 직접 플레이에 관여하는 오브젝트가 아니므로, 선택하거나 ray를 감지하거나 할 수 없도록 해야한다
간단하게 layer를 추가하자
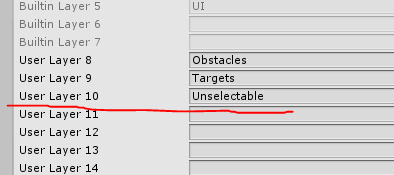
그다음 아까 그 Plane의 레이어를 변경 후, pick되지 않도록 잠궈준다

메인 카메라를 수정해준다
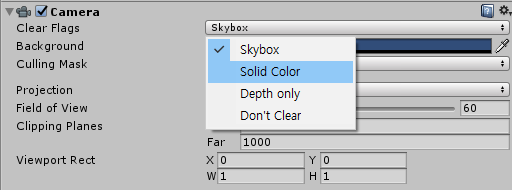
Solid Color로 바꾼뒤 Background를 (0,0,0) 검정색으로 바꾼다
이렇게 아무것도 안보이는게 정상이다
이제 플레이를 해보자!
이상입니다.
'유니티 > 실습' 카테고리의 다른 글
| Unity - Inventory2 - 01 - 시스템 파악, Instantiate (0) | 2022.02.15 |
|---|---|
| Unity - Inventory2 - 00 (0) | 2022.02.15 |
| Unity - Field of view - 05 - 추가작업 (0) | 2022.02.15 |
| Unity - Field of view - 04- 시야 범위 탐색 (0) | 2022.02.15 |
| Unity - Field of view - 03 - 타겟 탐색 (0) | 2022.02.15 |